
Adobe Photoshop is a brilliant tool for photo editing, however, did you know that you can use Microsoft PowerPoint for photo editing too? And you can even make great effects such as Double Exposure with PowerPoint when you know how to use it properly!
(You will find the way to create a Double Exposure effect in the end of this article, just keep reading!)
We all know that visual presentations and having quality photography will definitely bring a lot of benefits to both the speaker and the audience. Nonetheless, not every photo is a perfect fit for a presentation. Some times images are too dark, or they some need more lighting.
Using Adobe Photoshop to retouch these photos can be too time-consuming. Not to mention that Photoshop is much more complicated compared to PowerPoint, and it is not as accessible for a layman presenter.
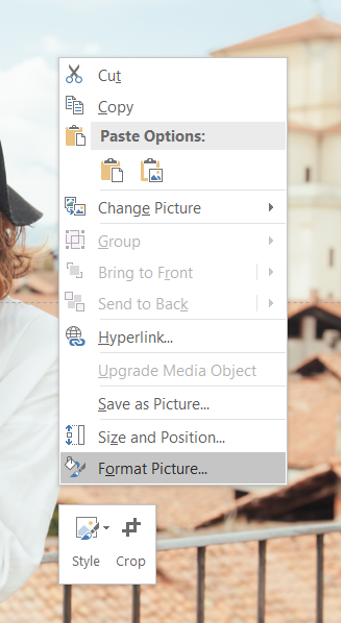
Fortunately, PowerPoint has extensive photo editing features which all PowerPoint user can easily access. Whenever you have a photo in the slide, if you click on it, the Picture Tools Format tab will appear.

Or you can also access it by right-clicking on the photo and choose Format Pictures…
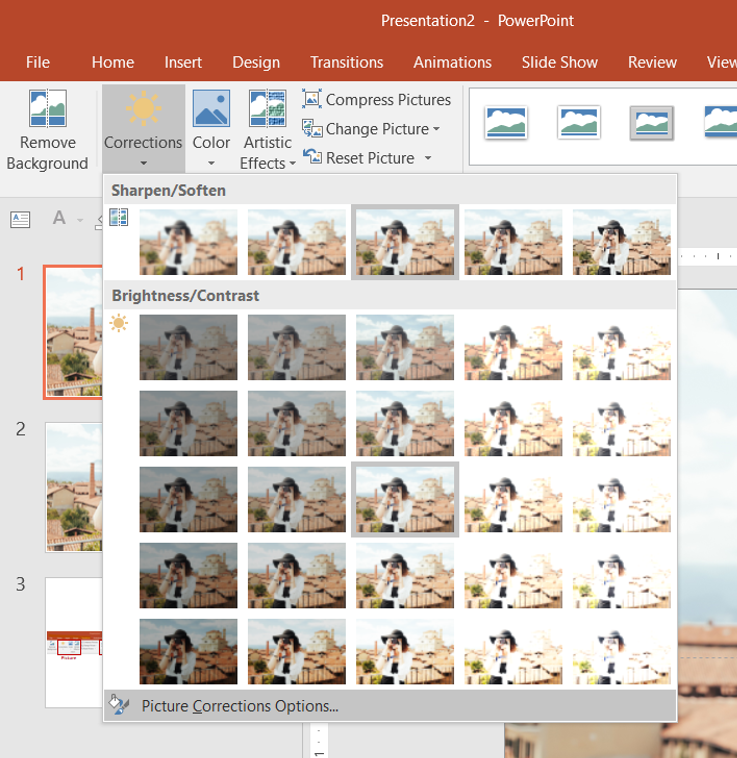
In Formatting Picture, you have Picture Corrections: Sharpen/Soften, Brightness/Contrast; Picture Color: Color Saturation, Color Tone (Temperature), Recolor; and Crop.
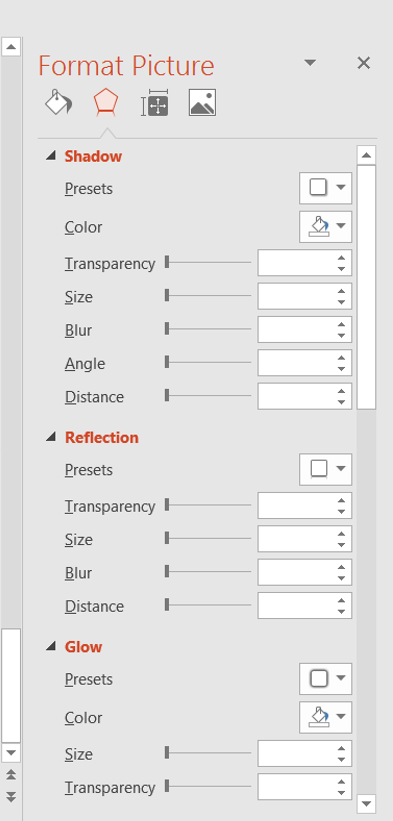
You can also add Effects for pictures, such as adding Shadow, Reflection, Glow, Soft Edges, 3-D Format, 3-D Rotation and Artistic Effects.
In Artistic Effects. you can find a number of different filters including: Marker, Pencil Grayscale, Pencil Sketch, Line Drawing, Chalk Sketch, Paint Strokes, Paint Brush, Glow Diffused, Blur, Light Screen, Watercolor Sponge, Film Grain, Mosaic Bubbles, Glass, Cement, Texturizer, Crisscross Etching, Pastels Smooth, Plastic Wrap, Cutout, Photocopy and Glow Edges.
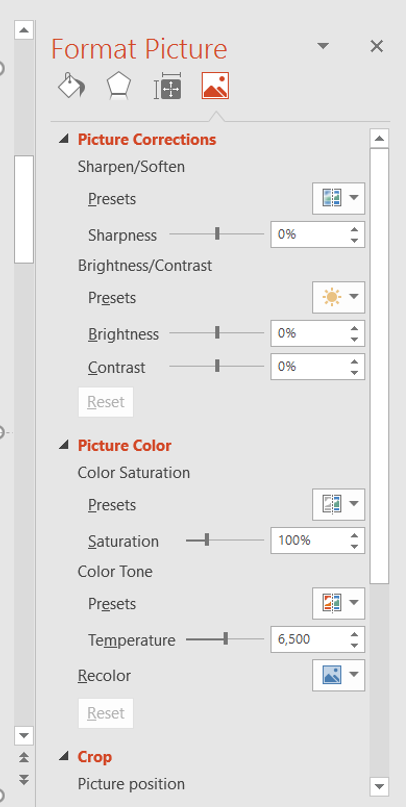
Format Pictures
On the top right of the window, you will find the tools for photo editing including Picture Corrections and Picture Color.
Picture Corrections
In Picture Corrections, you will find tools to adjust Sharpen/Soften and Brightness/Contrast.
Sharpen/Soften
The middle one is the original photo, we have options to adjust the Sharpness of the picture by Sharpen: 50%, Sharpen: 25%, Soften: 25% and Soften: 50%. Increasing the percentage of sharpness would increase clarity and structure of the photo. This would be beneficial if the photo lacks sharpness. To increase the softness would help you when you want to decrease the focus to the background photo. Besides, you can also increase focus to other elements on top of it such as icons or texts.
Brightness/Contrast
This grid is more complex since you have two axes. There is the horizontal axis implicating the increase of brightness, and the vertical axis implicating the increase of contrast. Thus, there are more options in case you want to increase the brightness but not the contrast, or vice versa, or increase/decrease both of them.
What if they are not enough?
Sometimes you may realize that these adjustments do not work as you expected. For instance, if you want to increase the sharpness by only 10%, what should you do? Is there any way to increase the brightness by 10% but the contrast by 20%?
It is possible if you choose Picture Corrections Options… on the bottom of Picture Corrections.
Here you will find the freedom to adjust the brightness, contrast, and sharpness as the way you want. not to depend on the available presets.
Crop
Cropping means simply keeping an area of a photo and getting rid of the rest. You will have different options of crop according to Shapes, to Aspect Ratio, to Fill the screen and still keep the original aspect ratio or Fit the screen to keep the whole area of the photo. You can also crop according to the height and width of the desired photo.

Picture Color
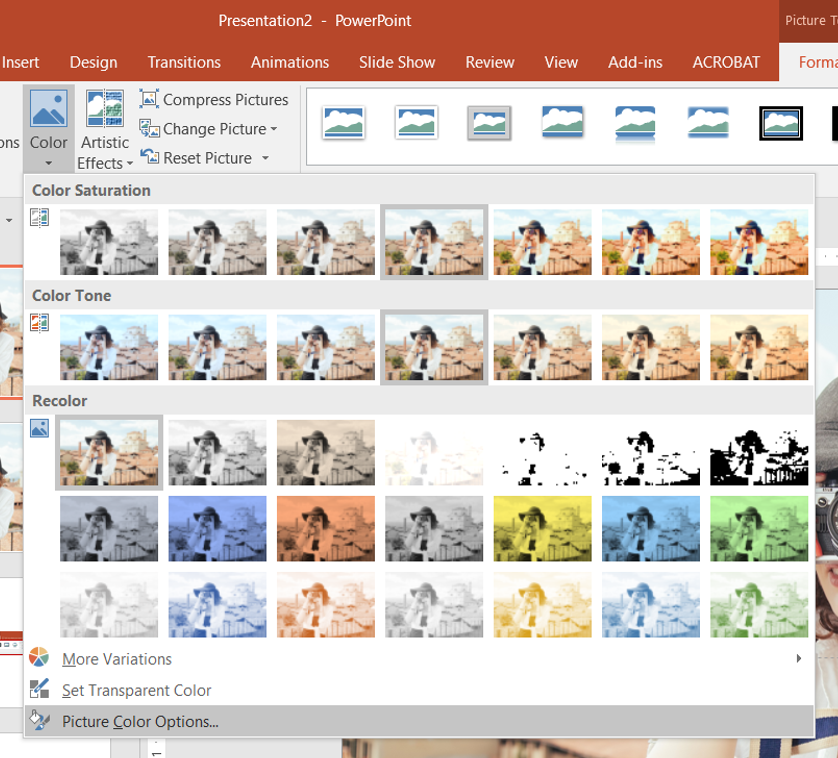
In Picture Corrections, you will find photo editing tools to adjust Color Saturation, Color Tone, and Recolor.
Color Saturation
Whether you want to make a photo to be more colorful and saturated or less colorful and desaturated, PowerPoint can serve your needs. From left to right, you will find the option to increase the saturation of the photo, with the first one is the B&W version and the middle one is the original photo.
Color Tone (or Temperature)
This is also alike to Color Saturation, but now you can make a photo either looks colder (more shade of blue) or warmer (more shade of orange).
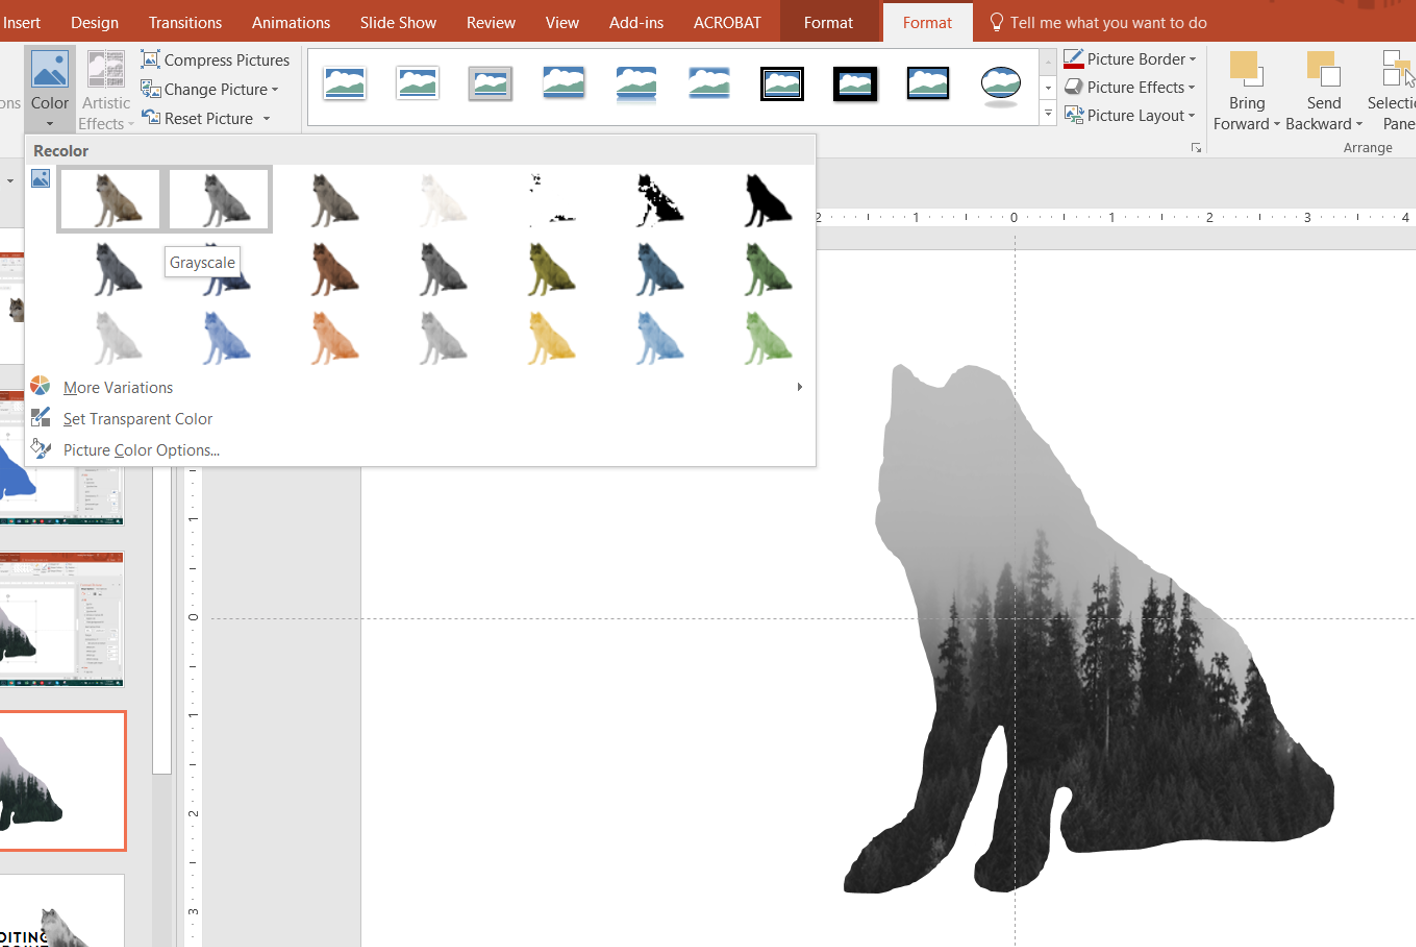
Recolor
This will be beneficial if you want to create a color tone for your whole presentation slides or to create a slide with duo-tone color.
What if they are not enough?
In the chance that the available presets are not enough, you will always find more in Picture Color Options… on the bottom of Picture Corrections.
Effects
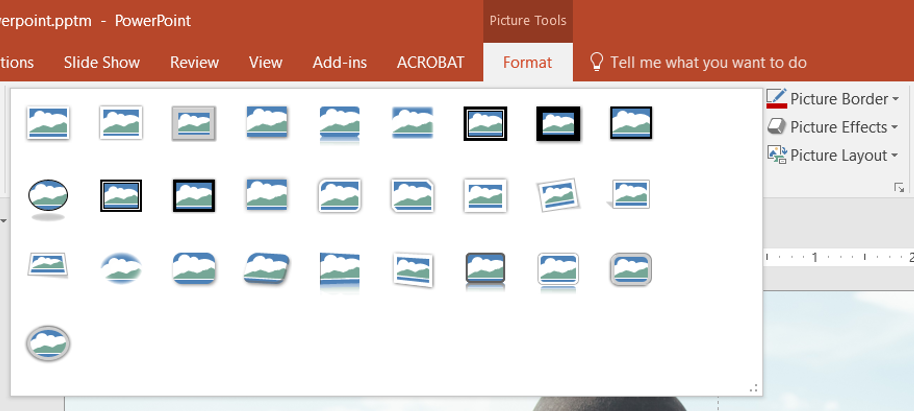
You will find a lot ready-made presets for your photo under the Image Format tab, they all look exciting and beautiful.
But be careful! Some of them could make your photo looks crappier with a lack of clarity. How can you avoid it? You can, of course, create your own presets, just by playing around with Picture Border and Picture Effects on the right.
In Picture Border, you can choose the color of the border and its weight, and decide whether you want dashes or not.
In Picture Effects, you can add Shadow, Reflection, Glow, Soft Edges, 3-D Format or 3-D Rotation to create the 3-D effect for the photo. Apart from the available variations in each effect, you can still adjust each on your own if you choose Shadow/Reflection/Glow/etc Options… You can also access to this by right-click at the photo, choose Format Pictures… and click on the Effects icon (the hexagon shape).
Artistic Effects
There are 22 different filters available in PowerPoint: Marker, Pencil Grayscale, Pencil Sketch, Line Drawing, Chalk Sketch, Paint Strokes, Paint Brush, Glow Diffused, Blur, Light Screen, Watercolor Sponge, Film Grain, Mosaic Bubbles, Glass, Cement, Texturizer, Crisscross Etching, Pastels Smooth, Plastic Wrap, Cutout, Photocopy and Glow Edges.
However, these filters sometimes are a bit too overwhelming for photo editing. Luckily, we can still adjust their Transparency and Size to make the filter looks more natural to the photo. You can find the way when you right click on the photo and choose Format Pictures…/Effects and scroll down to the end of the list.
Phew, we have covered quite a bit of basic knowledge about photo editing in PowerPoint! I hope this gave you some new insight into how PowerPoint can help you to edit pictures. And I wish it helps you to spend less time on editing photos.
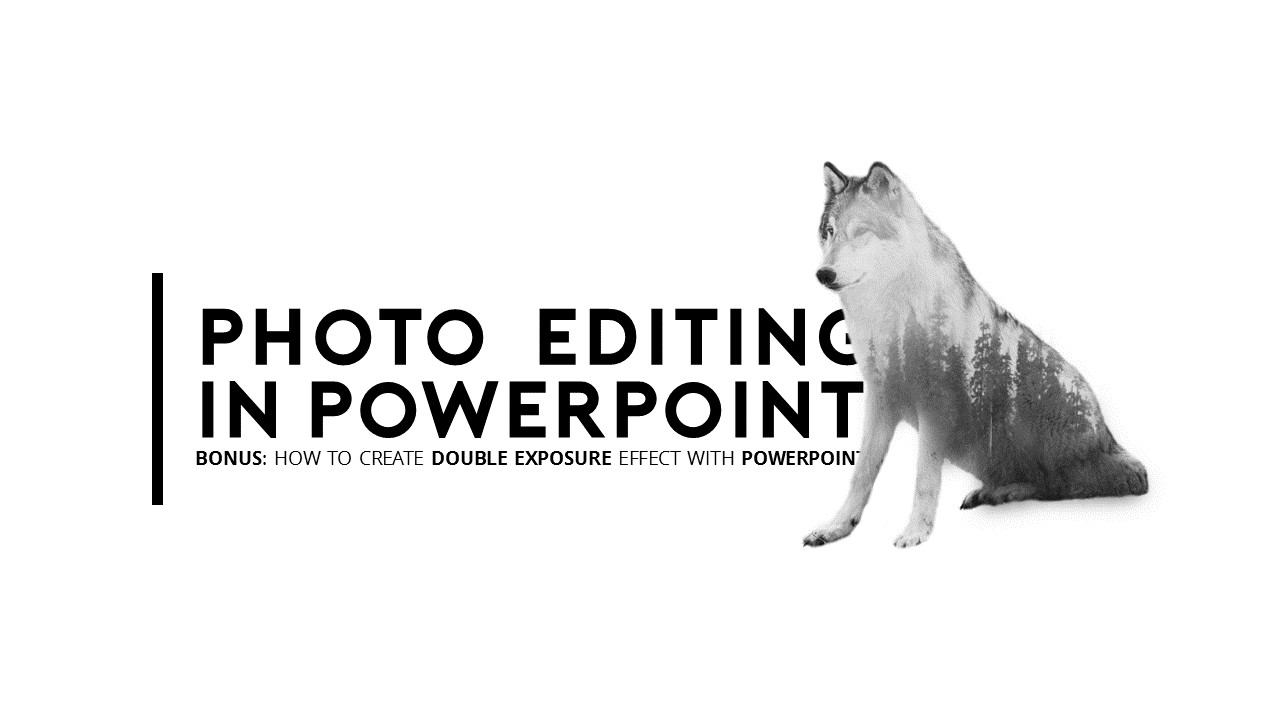
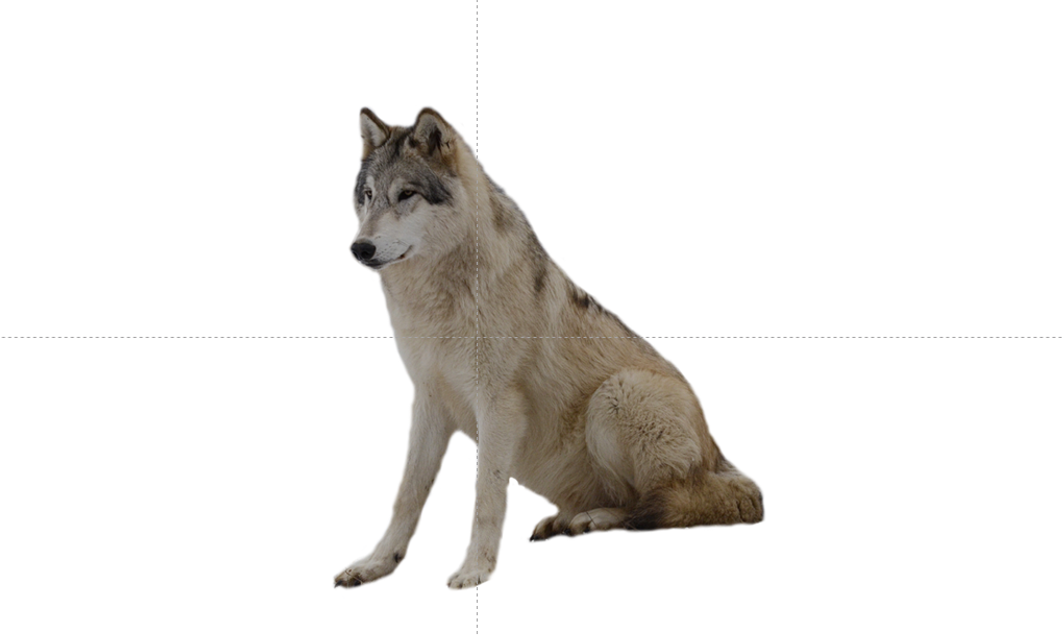
Here comes the exciting one: How can you create a Double Exposure effect in PowerPoint? (Remeber the photo in the beginning of this article? It had a double exposure of two photos – the wolf and the silhouette of a forest)
This is a great example on how PowerPoint can edit photos with much less work than Adobe Photoshop, and the result still looks wonderful!
How do you create a Double Exposure effect in PowerPoint
You saw the result at the beginning of this article: Image of a wolf and a forest seems to merge together, which is best known by the name of Double Exposure. This effect looks trendy and dynamic, whereas still elegant and mysterious somehow.
We will start with a photo of a wolf with transparent background in .png format I found from NoBacks.com and a photo of a forest I found in Unsplash.
Step 1: Insert the wolf into one slide. You can either choose Insert/Pictures or drag the wolf from the folder to the slide.
Step 2: Go to Insert/Shapes and choose Freeform: Scribble.
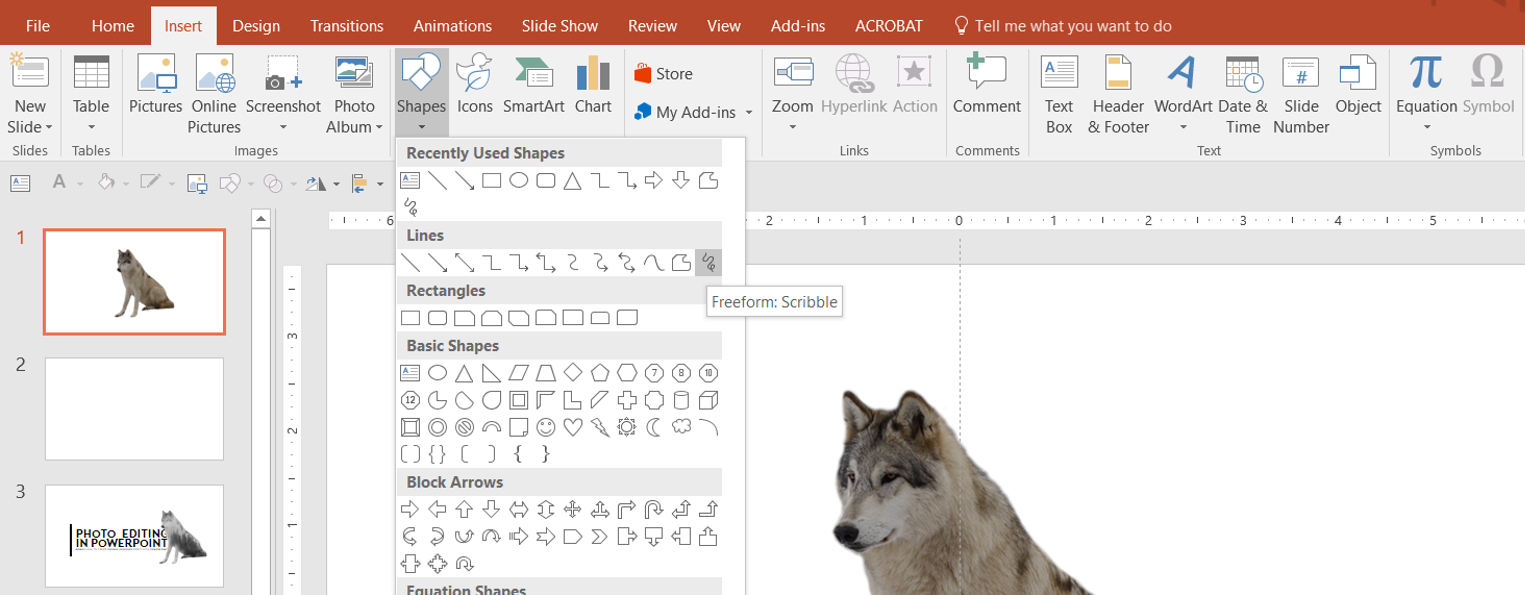
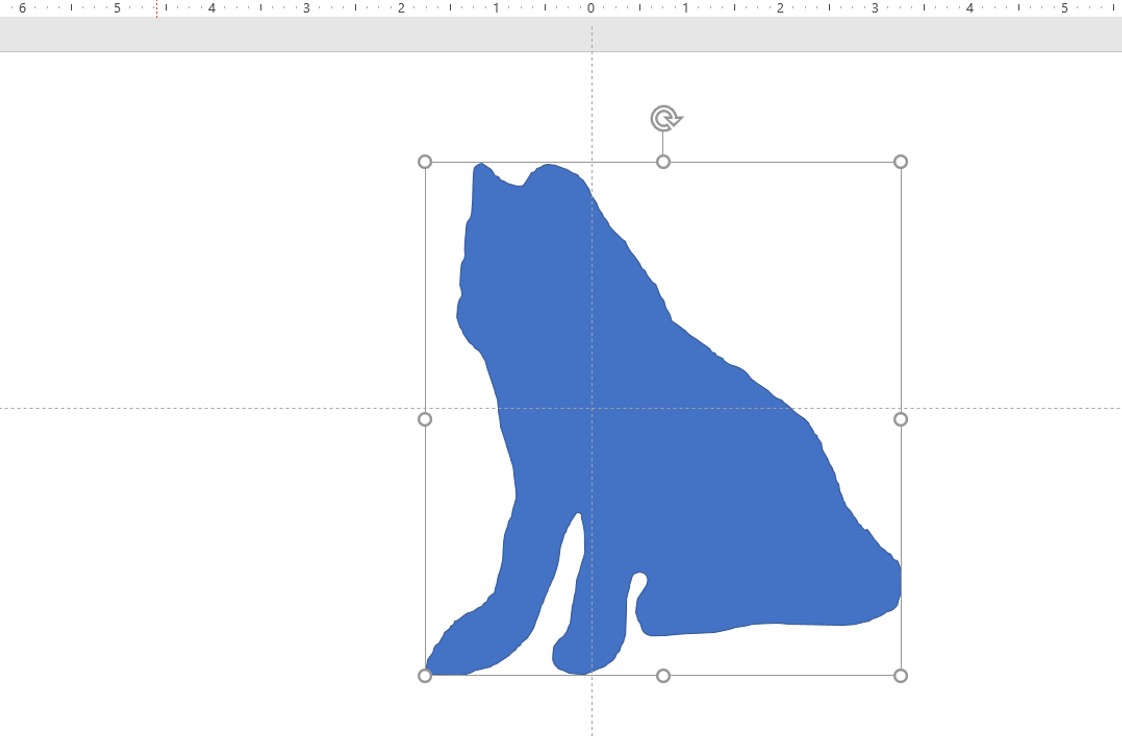
Step 3: Draw a shape with Scribble around the wolf. It is not necessary for the shape to be perfectly fit the wolf, you just need it to cover the wolf. Remember that this shape should always be on top of the wolf.
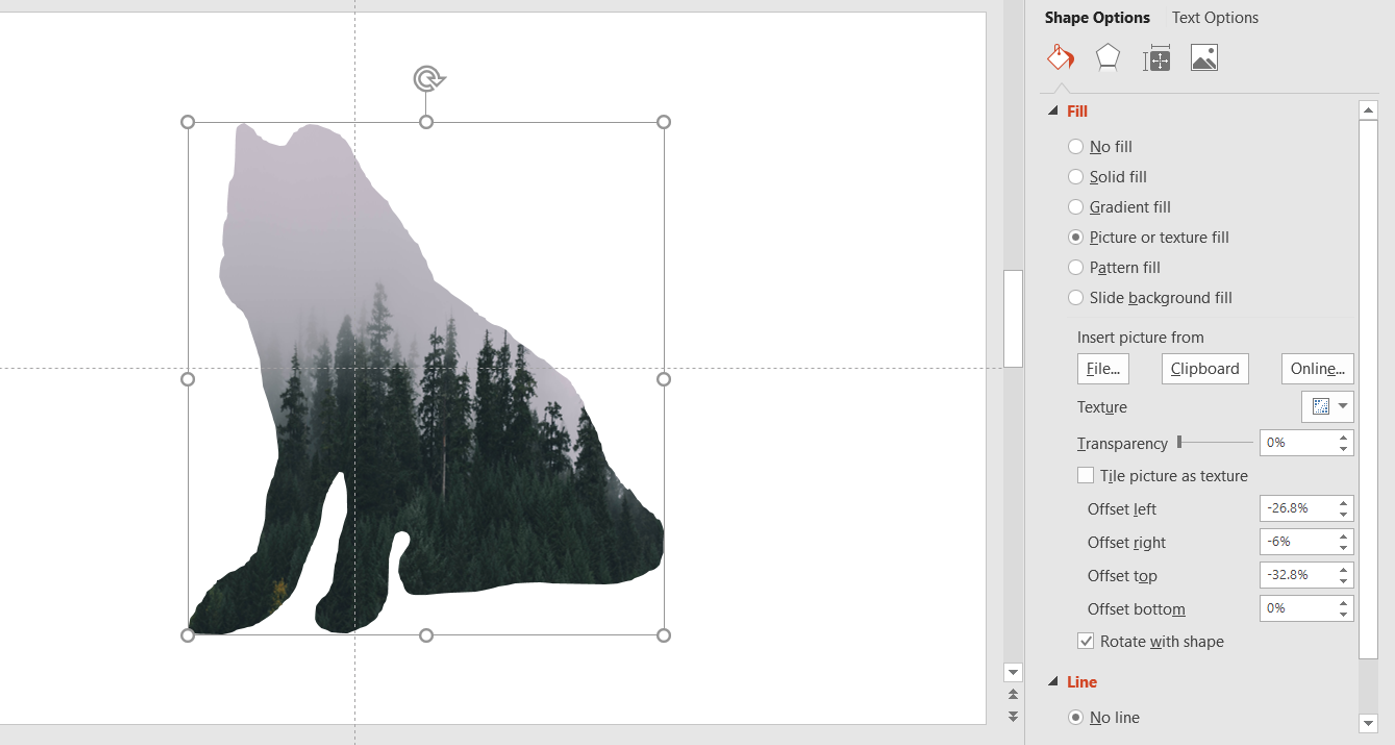
Step 4: Right click at the shape and choose Format Shape… In Fill option, choose Picture or texture fill, then click at File… under Insert picture from and choose the location of the forest photo. Remember to select No line.
Step 5: Select both the image of the wolf and the shape (now filled with the photo of the forest). Go to Picture Format/Color/Recolor and choose Grayscale for both.
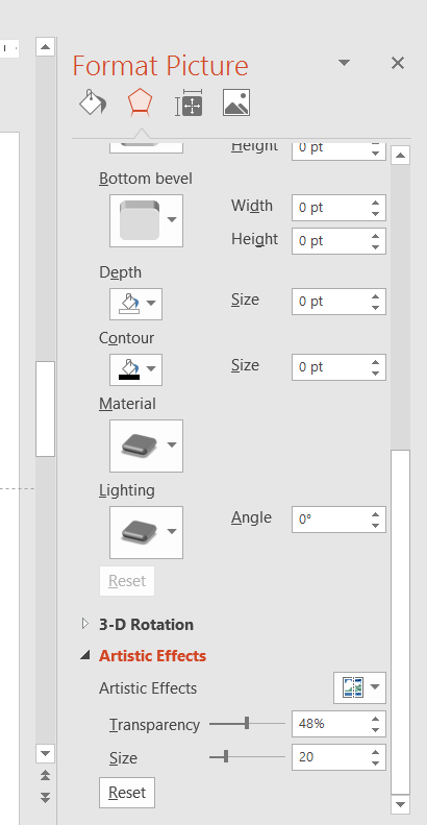
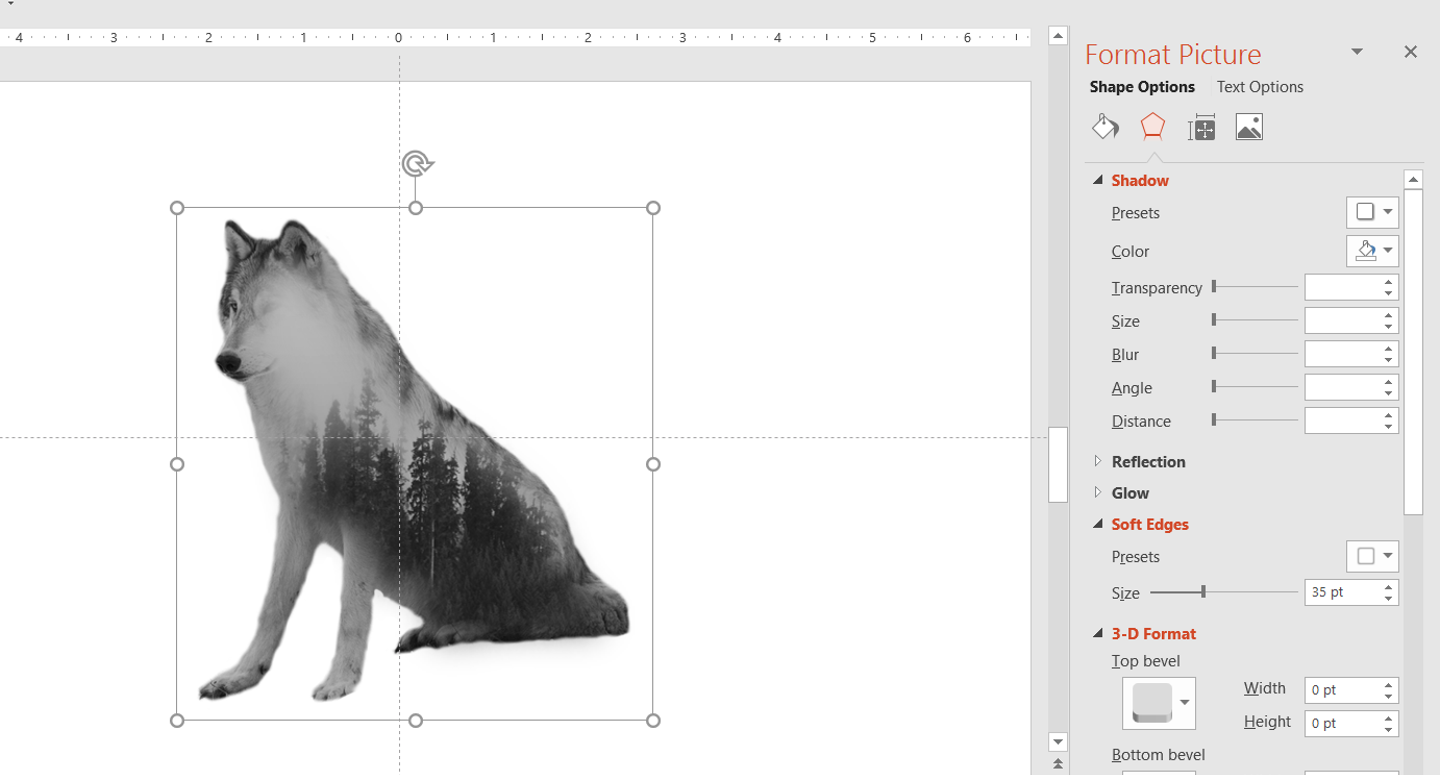
Step 6: Right click at the shape (filled with the photo of the forest) and choose Format Picture… Go to Effects. Under Soft Edges option, increase the size of the soft edge until it looks okay for you (for me I chose 35pt).
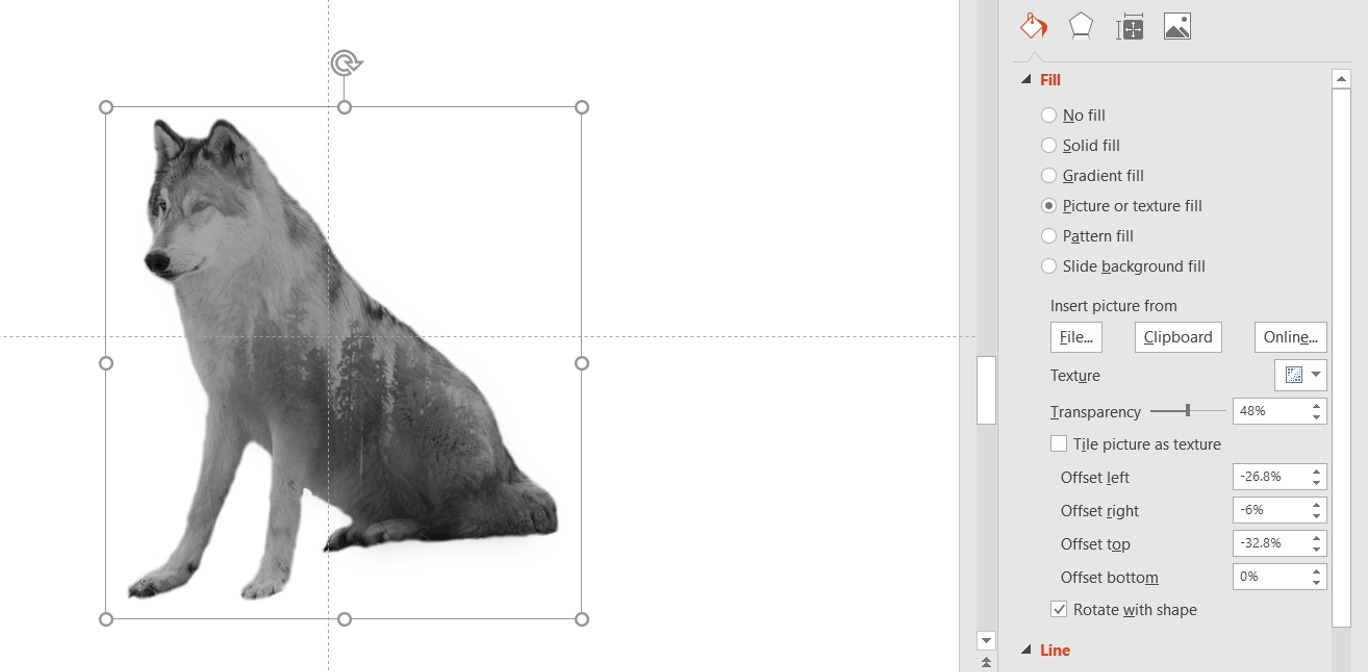
Step 7: Click Fill (the bucket icon). Increase the transparency of the photo of the forest to make it merge with the wolf. I chose 48%.
Step 8 (optional): Increase the brightness and contrast of both the wolf and the forest picture by 20% brightness and 20% contrast to make it look sharper.

Here is what I have now. Isn´t it cool? 🙂 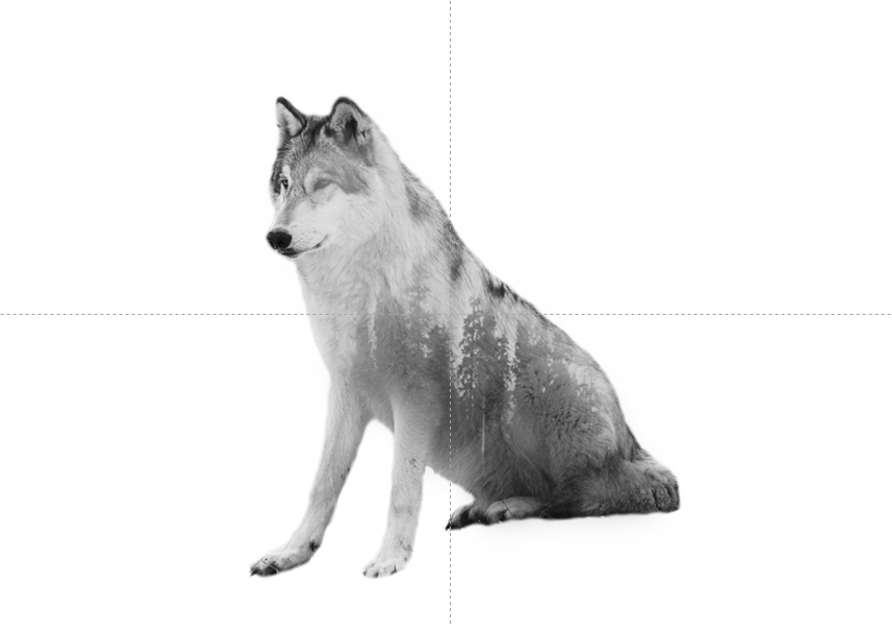
Now we just have to add some text and voila! We have a great slide with double exposure effect under 15 minutes, made completetly in PowerPoint!
What do you think of this article? Did you find something helpful for your presentation design? Do you have something to add? Do not hesitate, please comment below and let us know! 🙂
Enjoy reading about Design and Presentation Design?
Check out our blog post on Color theory & how to choose the right colors for your design!
And we are also updating blog posts about other tips and features in PowerPoint, such as how to remove background photo in photo editing. If you want to know more, stay tuned and subscribe to us! 🙂